Starting Plants from Seed 101, Part 2
Jan. 25th, 2010 08:45 pmLink to Part 1
I should note that y'all are going to laugh at me because in part 1 I said that you didn't need a lighting set-up and here in a couple of weeks I'll be telling you all about mine. This has everything to do with volume, though, helped along by the fact that I seem to be starting seeds for my husband's mother and aunt as well as my own, and my extra space is non-existent to start with! Plus, I came up with a way to do it with things that we pretty much already have on hand and all I'll need to buy is the bulbs. Strangely enough, just two days later, Thomas from agrowingtradition.com posted about what he was doing or indoor seed starting which was... pretty much what I'd come up with, actually. On January 19th, he had them assembled, so you can see what I'm planning (more or less - I already have the wire rack and the shop lights, and I won't be using a heat mat).
Okay, let's dive back into it, shall we?
Hardening Off
This is probably the more difficult bit for those working full-time jobs. The goal is to gradually introduce the wee seedlings to the sun and wind outside so that they aren't overwhelmed when they're actually placed in the garden. Tomato plants, in particular, can get sunburnt if initially left too long in the bright spring sunshine. There's no actual schedule, but a week or so before they're slated to go into the garden or otherwise outside planting area, set them outside in the sun for a couple of hours, earlier in the day or later in the afternoon. If you're not going to be home for a long stretch, you can find a spot where the sun will only be hitting for a little while and then is in shade the rest of the time (maybe it goes behind the house, or your neighbors house, or whatever). Over the next week, you want to increase the time the plants are outside/exposed, just making sure to bring them in at night.
Typing this I'm thinking oh holy hannah, some people do have actual jobs, ya know but it's not as bad as it sounds! For one thing, tomato plants build up sun tolerance significantly faster than humans. For another, if you accidentally stress them a bit too much, just bring them inside and make sure they have water and give them a day to recover. Resilient little buggers, they are.
Basic Site Preparation
The first thing most garden primers tell you is to get your soil tested. If you’re in the U.S., you can do this through your local extension office. I, uh, have never managed to get around to it. I do have a pH meter! I’ve also got highly amended soil - that is, a couple truck loads of aged horse/goat manure, plenty of wood chips, some compost, some straw... Of course, as of this year, I’ve also got all that ditch cleaning soil, so it will get lots more amendments during the final prep work (which is otherwise known as “D gets to play with the tractor and/or roto-tiller“). Not to mention that my garden soil was a soybean field before it was a garden, so it wasn’t going to be too bad, regardless.
Essentially, you want the soil loosened up to a depth of up to 2-3 feet (a meter or a little less) in the case of a tomato plant. If you’re only planting one or two plants, consider buying a bag of commercial compost to throw in with the soil the first year or two (if you’re growing more, it gets too pricey too quickly to make it worth it). If you do, have the soil test done after you’ve mixed it all in. Regardless, a soil test is a good idea and could save you a lot of frustration.
Transplanting into the Garden
I have, to this point, avoided all mention of actual calendar dates because it's the sort of thing that is based on where you live. I live in northwest Ohio, in zone 5b, and, on average, our annual last frost date is Mother's Day weekend - the first weekend in May. This means that I can put my plants out that weekend but I need to keep an eye on the weather forecast and be prepared to cover those plants if there's going to be a frost. I could also wait a week if I wanted to be on the safe side but I have nowhere near that amount of patience.
Anyway, this is the date that everything centers around. Some things can go in earlier (peas, lettuce, etc.) and some won't go in until the last weekend in May (peppers, especially, as they like the warmth and will just stand around looking pissy in a chilly garden), but that's the date I need to know. To find your date you could, of course, always ask some else who gardens, or you could check almanac.com for the most likely date. Oh look! It's a couple of links! Areas in the United States, and areas in Canada.
Since the day I plan on being in the garden (like a kid in a candy store...), weather permitting, is the first weekend in May, and the back of my tomato seed packets say to start 6-8 weeks before the last frost, I count backwards and come up with the first weekend in March. I could wait until the middle of March but, again, not that patient. Experience being useful for something, I'll be starting the onions two weeks later, and the peppers two weeks after that. Potatoes are/were the tricky ones this year - you have a selection of dates to choose from for delivery. Once they're delivered (basically, sections of potatoes!) they should be planted within a week or so and you don't want them emerging until after the last frost. Theoretically. I finally opted for April 12-14 shipping and if they emerge too early, well, I'm sure my mother in law has some old sheets I can borrow.
Back to transplanting! Well, first let's diverge into the area of tomato plants again and the question of whether you have determinate or indeterminate varieties. Determinate tomato plants grow a pre-determined amount and produce a pre-determined amount of fruit while indeterminate tomato plants will chipperly keep going as long as you let them - in other words, they sprawl considerably more if unchecked and require some kind of support. To be fair, I ended up staking and/or caging all my tomato plants last year because of the Kryptonite soil layer that I obviously didn't know was down there (they went feral, I tell ya). Ideally, to be on the safe side, you can allow at least three square feet or one square meter of space for each plant plus one additional square foot or 1/3 square meter to all four sides for passage and air flow between plants. It will look like too much at first, but - trust me here - it is way better to have too much space than too little, regardless.
Remember the part where we covered transplanting up to the 4” pots in part 1? Fantastic - do it again, this time into the garden soil. Make sure to add a bit of water at the bottom of the new hole (having it close to the roots is handy) and water them in a bit when you’re done. Also handy to mark what you planted where. The one thing I didn’t mark when I planted it last year and I thought was a cucumber turned out to be a couple of really big sunflowers. Whoops. For a while there I was thinking I was growing a special Little Shop of Horrors cucumber and it was going to eat one of the pups if I wasn’t careful. On the other hand, it was scarier than the out-of-control tomatoes, so there was a bright side.
If it’s going to frost, cover the little guys with an old bed sheet or a few handy buckets or actual frost cover made for just such a purpose.
Cages are not my favorite method, but I’ll probably be using them again this year. We already have them for one thing and the number of plants we’re dealing with for another. They are the easiest method for a new gardener, mainly because they’re the most common. Once the plants grown a bit (or, well, anytime in the first few weeks, really) you can just put cages around those tomatoes that are going to need them. Do make sure to tuck the new growth inside the cage on a daily basis or you’ll be tying a branch to the outside of the cage to support it. Not that I’ve ever had to do that. Ahem.
Standard Daily Maintenance
For most plants, regular weeding is obvious as is watering unless Mother Nature has saturated the ground in the last 24 hours. The main thing when watering is to add enough water to the soil that it actually gets down to the roots. I read something somewhere at some point in time that talked about someone having a childhood chore of getting a bucket of water for each plant and slowly pouring it out near the base. That’s... not going to happen around here. It did, however, create a good visual and do try to keep in mind that the water actually has to soften up the top crust of the soil and sink into root area.
There are a couple of ways to help this along: black plastic ‘mulch’ and actual mulch. I don’t like using black plastic. Although it warms the soil and retains moisture (meaning less watering), I don’t like walking on it and working around it. (I finally got it through to D why I didn’t like using it by whining “It just doesn’t feel the same!”, complete with unfortunate yet hilarious analogies.) If you live in an area chillier than mine, however, it may be unavoidable and/or fantastic. I prefer actual mulch - wood chips in my case, as I have a supply of them - for weed suppression and moisture control. It keeps the soil from crusting over too much on top and the moisture from evaporating too quickly. It also absorbs any extra water (either from me, the rain, or a forgotten sprinkler... not that I would do that *cough*).
One of the other important factors in healthy plant development is air flow. For most garden veggies, just following the planting distance specifications on the back of the seed packet will cover that aspect, but for some (i.e. TOMATOES), you can plan on some pruning. Suddenly the ‘determinate’ versus ‘indeterminate’ is important again! If the tomatoes are determinate, do not prune except in cases of damage or disease, although I would highly recommend some kind of mulch underneath so that limbs and fruit don’t lay on the bare soil and attract insects and rot. If the tomatoes are semi-determinate, they will do best caged, but not pruned. Indeterminate tomatoes bring some more options to the table. [More on indeterminate versus determinate @ botanicalinterests.com]
After a month or so in the garden, I like to prune off all but the main stems for the first 2 to 3 inches from the ground to allow for air flow underneath the plant. Then I start keeping an eye out for suckers. Now, bear in mind that you can just throw a cage over it and let the crazy thing go to town. This is not a problem, plenty of people do it that way. The purpose of pruning is that, in my opinion, you produce a healthier plant and it will produce fewer but larger tomatoes. Fruit squished up against and broken by the cage wires or other parts of the plant because it’s all stuffed in there can be a problem, too. Here’s a good video of it at vegetablegardener.com - which is an all around good site to check out, by the way. Here’s another link, this time with some nice images instead of video.
I’m not even going to try and recreate that content, but will highly suggest you check out one or both of those links! :)
Final item in the daily maintenance checklist: pests and disease. Every area is going to have different issues and for that there are a million references - both online and off - how to deal with them. I combated two common ones last year: blossom end rot and tomato horn worm. Blossom end rot is the result of not enough calcium in the soil and I dealt with it mainly by thinning out the too densely planted tomatoes (whooops) and pulling fruit in a very timely manner. This year the plants will not only be spaced further apart, they’ll also be getting planted with a scoop of chopped/powdered eggshells, which are purported to be rich in calcium. Score! This now means I’m collecting eggshells to be dried in the oven for 10 minutes and stashed for the upcoming spring. There are surely other methods that work, but I’m all about ‘free’ and ‘simple’.
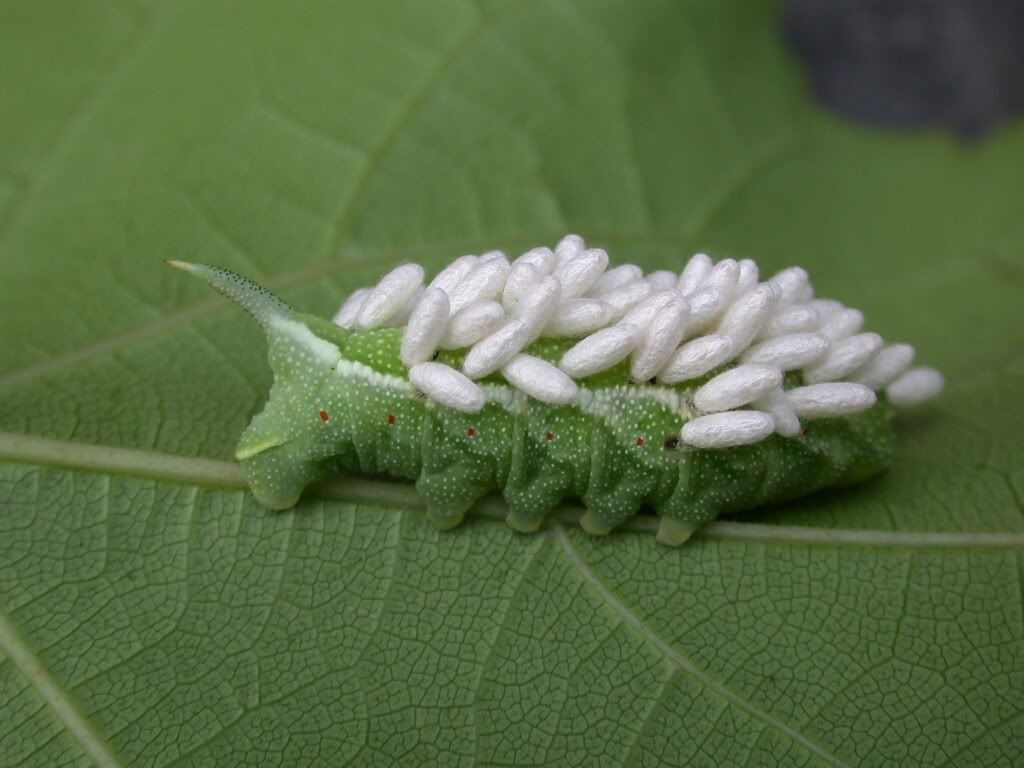
Tomato horn worm was the other issue and these things... ugh. Here, click this link for an image. It’s green and starts out very, very small which makes it tough to find until it’s not so small, doing plenty of damage, and just... kinda squishy. I used to be freaked out about the possibility of finding one blindly while messing around with the plants but have, fortunately, mostly gotten over that. It is exceedingly satisfying to snip them in half with the garden shears because they can strip branches and eat through fruit with remarkable speed. The only time you wouldn’t kill the little !@$@ is if it looks like it has little white eggs all over it. Which, by the way, is strangely disturbing. It means that it’s being parasitized, probably by a type of wasp, that you want more of because, hey, it kills tomato hornworms!
Anyway, they’re active primarily from dawn to dusk and sending out kids, and/or significant others that act like kids, with flashlights can be a very productive removal method. You can also find them by their trail of damage and by their excrement, which I would swear is sometimes larger than they are. Regardless, they actually hatch from eggs that are lain usually at the top of the plant by the adult moths, so that’s where to start.
Granted, as D says, my garden probably looks like an all you can eat buffet from the air for the moths from miles around. You may not have any if you have only a few plants or if you just plain get lucky!
Dinner!
Yeah, I think you can handle this section, right? ;P
I should note that y'all are going to laugh at me because in part 1 I said that you didn't need a lighting set-up and here in a couple of weeks I'll be telling you all about mine. This has everything to do with volume, though, helped along by the fact that I seem to be starting seeds for my husband's mother and aunt as well as my own, and my extra space is non-existent to start with! Plus, I came up with a way to do it with things that we pretty much already have on hand and all I'll need to buy is the bulbs. Strangely enough, just two days later, Thomas from agrowingtradition.com posted about what he was doing or indoor seed starting which was... pretty much what I'd come up with, actually. On January 19th, he had them assembled, so you can see what I'm planning (more or less - I already have the wire rack and the shop lights, and I won't be using a heat mat).
Okay, let's dive back into it, shall we?
Hardening Off
This is probably the more difficult bit for those working full-time jobs. The goal is to gradually introduce the wee seedlings to the sun and wind outside so that they aren't overwhelmed when they're actually placed in the garden. Tomato plants, in particular, can get sunburnt if initially left too long in the bright spring sunshine. There's no actual schedule, but a week or so before they're slated to go into the garden or otherwise outside planting area, set them outside in the sun for a couple of hours, earlier in the day or later in the afternoon. If you're not going to be home for a long stretch, you can find a spot where the sun will only be hitting for a little while and then is in shade the rest of the time (maybe it goes behind the house, or your neighbors house, or whatever). Over the next week, you want to increase the time the plants are outside/exposed, just making sure to bring them in at night.
Typing this I'm thinking oh holy hannah, some people do have actual jobs, ya know but it's not as bad as it sounds! For one thing, tomato plants build up sun tolerance significantly faster than humans. For another, if you accidentally stress them a bit too much, just bring them inside and make sure they have water and give them a day to recover. Resilient little buggers, they are.
Basic Site Preparation
The first thing most garden primers tell you is to get your soil tested. If you’re in the U.S., you can do this through your local extension office. I, uh, have never managed to get around to it. I do have a pH meter! I’ve also got highly amended soil - that is, a couple truck loads of aged horse/goat manure, plenty of wood chips, some compost, some straw... Of course, as of this year, I’ve also got all that ditch cleaning soil, so it will get lots more amendments during the final prep work (which is otherwise known as “D gets to play with the tractor and/or roto-tiller“). Not to mention that my garden soil was a soybean field before it was a garden, so it wasn’t going to be too bad, regardless.
Essentially, you want the soil loosened up to a depth of up to 2-3 feet (a meter or a little less) in the case of a tomato plant. If you’re only planting one or two plants, consider buying a bag of commercial compost to throw in with the soil the first year or two (if you’re growing more, it gets too pricey too quickly to make it worth it). If you do, have the soil test done after you’ve mixed it all in. Regardless, a soil test is a good idea and could save you a lot of frustration.
Transplanting into the Garden
I have, to this point, avoided all mention of actual calendar dates because it's the sort of thing that is based on where you live. I live in northwest Ohio, in zone 5b, and, on average, our annual last frost date is Mother's Day weekend - the first weekend in May. This means that I can put my plants out that weekend but I need to keep an eye on the weather forecast and be prepared to cover those plants if there's going to be a frost. I could also wait a week if I wanted to be on the safe side but I have nowhere near that amount of patience.
Anyway, this is the date that everything centers around. Some things can go in earlier (peas, lettuce, etc.) and some won't go in until the last weekend in May (peppers, especially, as they like the warmth and will just stand around looking pissy in a chilly garden), but that's the date I need to know. To find your date you could, of course, always ask some else who gardens, or you could check almanac.com for the most likely date. Oh look! It's a couple of links! Areas in the United States, and areas in Canada.
Since the day I plan on being in the garden (like a kid in a candy store...), weather permitting, is the first weekend in May, and the back of my tomato seed packets say to start 6-8 weeks before the last frost, I count backwards and come up with the first weekend in March. I could wait until the middle of March but, again, not that patient. Experience being useful for something, I'll be starting the onions two weeks later, and the peppers two weeks after that. Potatoes are/were the tricky ones this year - you have a selection of dates to choose from for delivery. Once they're delivered (basically, sections of potatoes!) they should be planted within a week or so and you don't want them emerging until after the last frost. Theoretically. I finally opted for April 12-14 shipping and if they emerge too early, well, I'm sure my mother in law has some old sheets I can borrow.
Back to transplanting! Well, first let's diverge into the area of tomato plants again and the question of whether you have determinate or indeterminate varieties. Determinate tomato plants grow a pre-determined amount and produce a pre-determined amount of fruit while indeterminate tomato plants will chipperly keep going as long as you let them - in other words, they sprawl considerably more if unchecked and require some kind of support. To be fair, I ended up staking and/or caging all my tomato plants last year because of the Kryptonite soil layer that I obviously didn't know was down there (they went feral, I tell ya). Ideally, to be on the safe side, you can allow at least three square feet or one square meter of space for each plant plus one additional square foot or 1/3 square meter to all four sides for passage and air flow between plants. It will look like too much at first, but - trust me here - it is way better to have too much space than too little, regardless.
Remember the part where we covered transplanting up to the 4” pots in part 1? Fantastic - do it again, this time into the garden soil. Make sure to add a bit of water at the bottom of the new hole (having it close to the roots is handy) and water them in a bit when you’re done. Also handy to mark what you planted where. The one thing I didn’t mark when I planted it last year and I thought was a cucumber turned out to be a couple of really big sunflowers. Whoops. For a while there I was thinking I was growing a special Little Shop of Horrors cucumber and it was going to eat one of the pups if I wasn’t careful. On the other hand, it was scarier than the out-of-control tomatoes, so there was a bright side.
If it’s going to frost, cover the little guys with an old bed sheet or a few handy buckets or actual frost cover made for just such a purpose.
Cages are not my favorite method, but I’ll probably be using them again this year. We already have them for one thing and the number of plants we’re dealing with for another. They are the easiest method for a new gardener, mainly because they’re the most common. Once the plants grown a bit (or, well, anytime in the first few weeks, really) you can just put cages around those tomatoes that are going to need them. Do make sure to tuck the new growth inside the cage on a daily basis or you’ll be tying a branch to the outside of the cage to support it. Not that I’ve ever had to do that. Ahem.
Standard Daily Maintenance
For most plants, regular weeding is obvious as is watering unless Mother Nature has saturated the ground in the last 24 hours. The main thing when watering is to add enough water to the soil that it actually gets down to the roots. I read something somewhere at some point in time that talked about someone having a childhood chore of getting a bucket of water for each plant and slowly pouring it out near the base. That’s... not going to happen around here. It did, however, create a good visual and do try to keep in mind that the water actually has to soften up the top crust of the soil and sink into root area.
There are a couple of ways to help this along: black plastic ‘mulch’ and actual mulch. I don’t like using black plastic. Although it warms the soil and retains moisture (meaning less watering), I don’t like walking on it and working around it. (I finally got it through to D why I didn’t like using it by whining “It just doesn’t feel the same!”, complete with unfortunate yet hilarious analogies.) If you live in an area chillier than mine, however, it may be unavoidable and/or fantastic. I prefer actual mulch - wood chips in my case, as I have a supply of them - for weed suppression and moisture control. It keeps the soil from crusting over too much on top and the moisture from evaporating too quickly. It also absorbs any extra water (either from me, the rain, or a forgotten sprinkler... not that I would do that *cough*).
One of the other important factors in healthy plant development is air flow. For most garden veggies, just following the planting distance specifications on the back of the seed packet will cover that aspect, but for some (i.e. TOMATOES), you can plan on some pruning. Suddenly the ‘determinate’ versus ‘indeterminate’ is important again! If the tomatoes are determinate, do not prune except in cases of damage or disease, although I would highly recommend some kind of mulch underneath so that limbs and fruit don’t lay on the bare soil and attract insects and rot. If the tomatoes are semi-determinate, they will do best caged, but not pruned. Indeterminate tomatoes bring some more options to the table. [More on indeterminate versus determinate @ botanicalinterests.com]
After a month or so in the garden, I like to prune off all but the main stems for the first 2 to 3 inches from the ground to allow for air flow underneath the plant. Then I start keeping an eye out for suckers. Now, bear in mind that you can just throw a cage over it and let the crazy thing go to town. This is not a problem, plenty of people do it that way. The purpose of pruning is that, in my opinion, you produce a healthier plant and it will produce fewer but larger tomatoes. Fruit squished up against and broken by the cage wires or other parts of the plant because it’s all stuffed in there can be a problem, too. Here’s a good video of it at vegetablegardener.com - which is an all around good site to check out, by the way. Here’s another link, this time with some nice images instead of video.
I’m not even going to try and recreate that content, but will highly suggest you check out one or both of those links! :)
Final item in the daily maintenance checklist: pests and disease. Every area is going to have different issues and for that there are a million references - both online and off - how to deal with them. I combated two common ones last year: blossom end rot and tomato horn worm. Blossom end rot is the result of not enough calcium in the soil and I dealt with it mainly by thinning out the too densely planted tomatoes (whooops) and pulling fruit in a very timely manner. This year the plants will not only be spaced further apart, they’ll also be getting planted with a scoop of chopped/powdered eggshells, which are purported to be rich in calcium. Score! This now means I’m collecting eggshells to be dried in the oven for 10 minutes and stashed for the upcoming spring. There are surely other methods that work, but I’m all about ‘free’ and ‘simple’.
Tomato horn worm was the other issue and these things... ugh. Here, click this link for an image. It’s green and starts out very, very small which makes it tough to find until it’s not so small, doing plenty of damage, and just... kinda squishy. I used to be freaked out about the possibility of finding one blindly while messing around with the plants but have, fortunately, mostly gotten over that. It is exceedingly satisfying to snip them in half with the garden shears because they can strip branches and eat through fruit with remarkable speed. The only time you wouldn’t kill the little !@$@ is if it looks like it has little white eggs all over it. Which, by the way, is strangely disturbing. It means that it’s being parasitized, probably by a type of wasp, that you want more of because, hey, it kills tomato hornworms!
Anyway, they’re active primarily from dawn to dusk and sending out kids, and/or significant others that act like kids, with flashlights can be a very productive removal method. You can also find them by their trail of damage and by their excrement, which I would swear is sometimes larger than they are. Regardless, they actually hatch from eggs that are lain usually at the top of the plant by the adult moths, so that’s where to start.
Granted, as D says, my garden probably looks like an all you can eat buffet from the air for the moths from miles around. You may not have any if you have only a few plants or if you just plain get lucky!
Dinner!
Yeah, I think you can handle this section, right? ;P